Table of contents for Making medical jewelry fancy
In the last post I showed how just replacing the original chain with a nicer one can make your bracelet look a lot better (well, if you don’t use cheap chain like I did, that is). Today, I’ll talk about making a really dressy chain bracelet.
I started out with a plain stainless steel bracelet, Item #A492, for this project. There doesn’t seem to be a way to link directly to this on the MedicAlert web site. If you want a gold bracelet, I’d recommend the Gold Titanium Sleek Stretchband, item #A706.
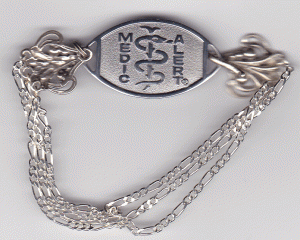
For this one, you will need your wire cutters and pliers for the chain bracelet, or your small screwdriver for the stretch band bracelet. You will also need a length of figaro chain (or other small  decorative chain of your choice) that is about three times the length of the existing chain, and a fancy clasp that accommodates multiple chains and hooks together. You will also need small jump rings to attach the chain to the clasp. I apologize for the somewhat blurry photo that accompnies this. I wasn’t able to get reasonable pictures with my somewhat ancient point-and-shoot digital camera, so I laid the bracelet on my scanner instead.
Begin by removing the existing chain, as I explained in the last post, or by turning over your stretch-band bracelet and prying loose the ends of the bracelet with your screwdriver. You will also remove the ring to which the current clasp attaches on the chain bracelet (leave the other ring opened but still attached). Lay the original chain out on the table, and measure three lengths of new chain. The best way to get the measurement is to place the halves of the clasp at each end of the existing chain, and stretch the new chain out beside it. The clasp I used for this bracelet has its center chain attachment a bit farther from the hook than the side chains. I forgot to accommodate this when I cut the chain, so the center chain ended up being a tad too long. This doesn’t cause serious problems so I left it as it was.
Carefully string your chain from one part of the clasp to the other, making sure you don’t get the lengths of chain crossed up on the way (and why do you think I mention this). 🙂 Wrap the bracelet around your arm and check to make sure the length of the chain is correct, and adjust it if necessary. Again, you want to make sure the bracelet is loose enough that it can be easily turned over to see the information on the back. With this clasp, you also want to leave enough space that the hook on the loose end can be fastened through the open end of the bracelet from underneath. If you have started with a stretch bracelet, you will need to put a sturdy jump ring or split ring on the left side of the emblem, to secure the permanently-attached end of the clasp.
Once you’re happy with the length of the bracelet, make sure all your jump rings are securely fastened and your chains aren’t twisted, and there you go! Dressy enough to wear on special occasions, if you like.
Next up: How to turn a plain bracelet into a fancy necklace.
Hope you'll recommend my posts via your favorite social media. Just don't copy the material as your own.
